Name tab
The Name tab of "Add/Change Customer" contains the customer name and address information.
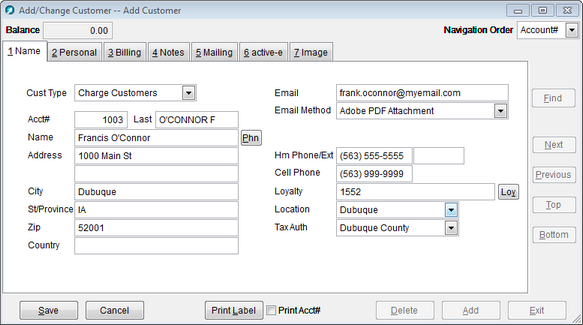
Cust Type
The customer type represents the type of customer you are adding. The customer types and related information should be pre-established in "Customer Defaults" on the Customer Maintenance menu.
Click in the Cust Type box and select the applicable customer type from the drop down list. The information pertaining to the type selected will be automatically added to the appropriate boxes on the various tabs of "Add/Change Customer".
The e-mail address of the customer you are adding.
Email Method
Indicates the preferred format of the email to the customer. The available options are:
- Ask for Email: If you do not have the customer's email address and you would like the sales person to be prompted to ask for it, select this option. The 'AddressCheckPrompt' system variable needs to also have a 'Value' of 1 or 2. Additionally, the 'Email Prompt Setting' for the workstation needs to be set to 'Prompt for Email'.
- Do Not Send Emails: The customer does not want correspondence emailed.
- HTML in Body: The correspondence being emailed should be sent in HTML format in the body of the email.
- Microsoft Word as Attachment: The correspondence being emailed should be saved in Microsoft Word .doc format and attached to the email.
- Adobe PDF Attachment: The correspondence being emailed should be converted to an Adobe .pdf file and attached to the email.
Acct#
The customer account number will be automatically incremented according to the last account number used. You may click in the Acct# box and change the account number if necessary. The account number must be unique.
If it is necessary to change the account number to start with, refer to the 'NextAcct' system variable found in "System Variables" on the General Maintenance menu.
Note: A customer account number should never be less than 201. Account numbers less than 201 represent store accounts and therefore will not appear in customer selection boxes.
Last
The last name of the individual or short name of business or institution used when searching for the customer record.
Last will be automatically updated with the individual's last name when the Name is typed.
If the customer type selected was flagged to stop at Last when new customers are added, you will be taken directly to Last upon selecting the customer type. Type the name you wish to use when searching for the customer. Refer to "Customer Defaults" for more information on the 'Stop at Last…' option. Instances where Last should be manually typed as opposed to automatically created are when adding a customer account for a school, church or business.
Name
The customer's name. If adding an individual record, type the first name first, last name last.
Address
The customer's street address. This is the primary address to use when mailing invoices, letters, sale notices, etc. Shipping addresses may be established in "Ship To Addresses" on the Customer Maintenance menu. Shipping addresses may always be added or changed in POS.
The address field consists of two separate areas that may be used for the street address of the customer.
Upon typing the Address, a search will be performed for duplicates. If other customer accounts were found with the Name and Address entered, the following window will appear:
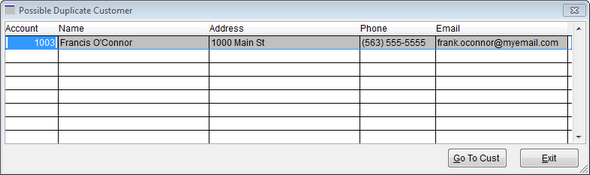
If the customer is not a duplicate and you wish to continue with the add, press the Esc button on your keyboard or click the Exit button. If the customer is a duplicate and you would like to cancel the add and go to the customer account listed, click the Go To Cust button.
Zip
The zip/postal code of the street address entered as the Address.
The zip/postal code comes before City, State and Country in the tab order because if the zip code has been entered on a previous customer record, the City, State and Country will automatically be brought forward to this customer record. This saves you from having to retype the City, State and Country for each new customer added.
City
The city of the customer.
State
The state/province of the customer.
Country
The country of the customer.
Note: If the city, state or country were entered incorrectly, they will be saved to the zip code table incorrectly. You should correct the Zip Code Table by using "Add/Change Zip Codes" on the Customer Maintenance menu.
Hm Phone/Ext
The customer's home phone number if you are adding an individual account or the primary work number if you are adding a business or institution account. The Extension box pertains to business or institution accounts. Type here the direct extension of the person you are in contact with at the business/institution being added.
Cell Phone
The cell phone number of the customer being added.
Loyalty
If this customer is going to be a part of your loyalty program and you are issuing the customer a loyalty card, scan the card in this field, or manually type in the number. This associates the card number with the customer and allows the card to be scanned in the 'Pick Customer' list box in order to find the customer account in POS.
If you are not using loyalty cards but would still like to issue the customer a loyalty number in order to accumulate loyalty points, enter the loyalty number in the Loyalty field or click the  button in order for AIMsi to assign the customer a unique number.
If it is necessary to change the loyalty number to start with, refer to the 'NextLoyalty' system variable found in "System Variables" on the General Maintenance menu.
Location
The Location will default to the store location of the workstation. If you have multiple store locations and you would like to save a location other than the location of the workstation to the customer account, click in the Location box and select the location from the drop down list.
Tax Auth
The Tax Authority will default to the tax authority of the workstation. If the customer is to be charged a tax rate other than the rate of the authority of the workstation, click in the Tax Auth box and select the authority from the drop down list.